
In this post, I will take you through my process of capturing an astrophotography. From planning the observation to the final image what steps do I in my process? The first step is always getting an idea for an interesting project – this could be anything from gathering more data on a target that I already have observed previously, or it is a brand new target.
Selecting a target
For this particular project, I have decided I want to photograph the nebula IC 1396 also known as the Elephant’s trunk nebula. From, my location in Gjern, Denmark. It can be observed due north at the moment of writing. This is ideal since it has been somewhat windy with wind coming from a southern direction for the past week, this will make my rig less affected by wind. Usually, I would have spent some time selecting the target before setting up my rig. But now and then you encounter moments where the weather is the limiting factor. In Denmark, it has been almost 100 % overcast and rainy since January 1st. Hence you will have to choose on the spot what to observe.
I know that the nebula of IC 1396 has some very nice dust features that are hidden from our eyes – however, they require quite a lot of exposure time. So here follows a description of how I would usually go about my planning of an astrophoto. You can see an image of the Elephant’s trunk nebula by Simon Todd at Astrobin.
Planning the observations
When you have decided on a target you need a plan to execute – if you have limited yourself to one target only there is no problem, you just go out set up, and start collecting photons. But if you are like me, you plan to get the most out of your targets. When you have multiple targets you want to be observing them when they are closest to the zenith, since that is when you would expect to get the clearest images since your photos have been taken through less atmosphere than at lower altitudes.
The chart below is known as a visibility plot it is used by astronomers to determine what object to observe at what times. so how do you read a diagram like this? First of all, it has four axes that we need to address. The horizontal axis at the bottom gives the time in both UT – small numbers, and local time larger numbers. The horizontal axis at the top of the graph indicates the Local Sidereal Time (LST), along with notations of sunset/sunrise and nautical twilight and astronomical twilight basically the more white the background, the better the observing conditions should be.
Next, if you look at the vertical axis at the left you will find the altitude of the object in degrees, here zero mean ground level and 90 mean zenit. The higher in the sky the better observing condition, less elongation of the object. On the right-hand side, you find the airmass which is a measure of how much atmosphere you are observing, the smaller the number the better, preferably less than 1.5.
By moving the slider back and forth you can see the difference between a night with only one target and a night with a lot of targets, prioritized to get approximately 1 hour for each target.


Researching the astrophoto target
The second step is to research the object that I want to make an astrophot of, I usually start my journey at the astronomical database SIMBAD where I can obtain the coordinates I need for my visibility plot and also get information on what magnitudes I can expect the object to have. Especially for galaxies and stellar clusters – reflection nebulae like the Elephant’s trunk nebula is a different matter.
The observations
Now it is time to set up the rig and get those images. As I have described previously in the blog post on weather improvements and new gear, I use the ASIair mini to control my Sky-Watcher – Star Adventurer GTi as well as my Nikon Z5 and the ZWO ASI120mm mini guide camera. The first thing I do after having set up everything and done polar alignment I go to my object and turn on my guiding, from the ASIair software.
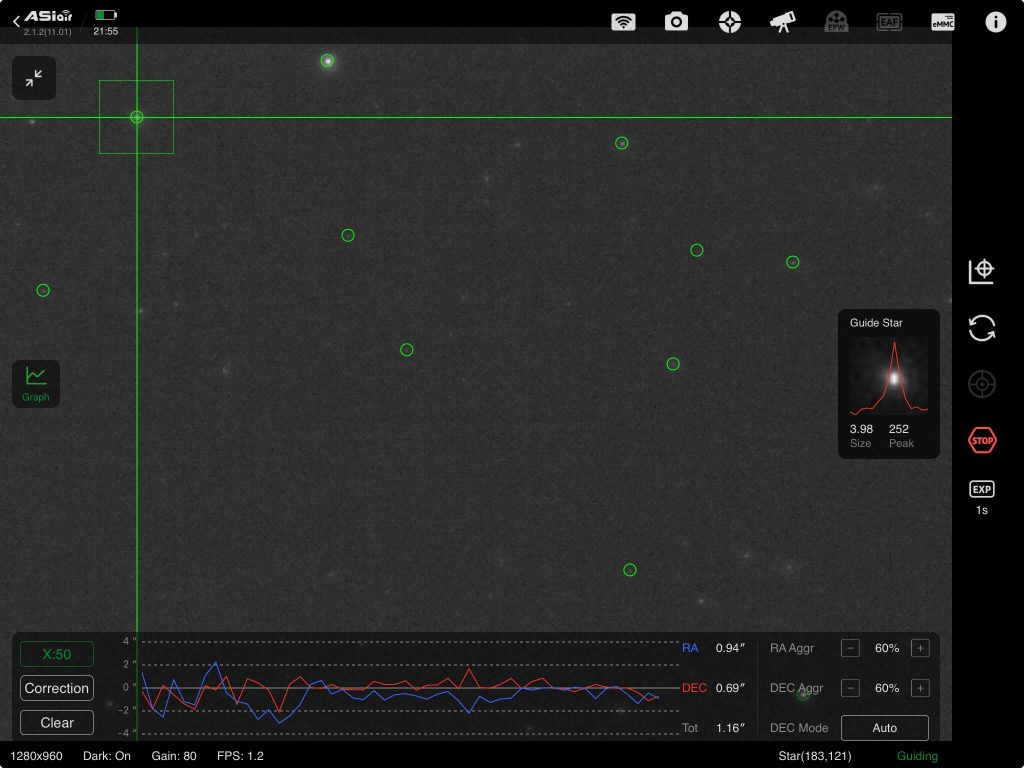
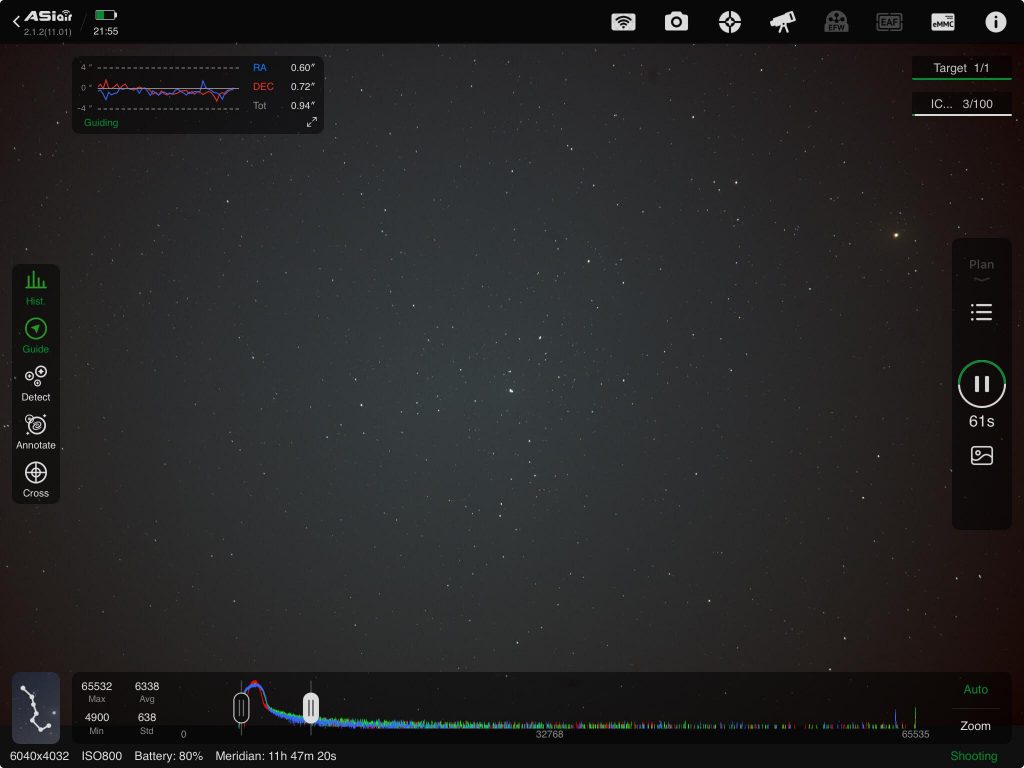
Then I test exposure times for my specific target and night conditions. This particular night I ended up with 120-second exposures. When I am in focus and have the optimal exposure times figured out, I set up a plan in the ASIair software and hit the play button. Then the rig will recenter the target and start taking astrophotos of the object when the auto-guider has settled.
Unfortunately, I had some issues with clouds and satellites obstructing my view of the sky. Because of that, I did only managed to obtain 47 images which is way too few to get a reasonable result with a faint object like this one.
I managed to obtain a total of 47 exposures of IC 1396 during my first windy night of observation which yielded a total integration time of 94 minutes since every photo had an integration time of 120 seconds. However, during the stacking of my images, 12 images were rejected which brought my initial data set from the first night down to 35 subframes of 120 seconds, hence giving me a total integration time from the first night of 70 minutes.
Therefore I will have to spend more time on this target to get a reasonable signal-to-noise ratio. With my 70 minutes of data, I can only hope to create a mediocre astrophoto of IC 1396.
The main problem with observing IC1396 is that it is a very faint object hence it requires a lot of integration time. Integration time is a reference to the amount of time that the camera shutter has been open and exposing the image sensor to the photons from space.
Time to reveal the Astrophot of IC 1396
The first night out I was able to collect a total of 35 light frames with exposure times of 120 seconds per light frame I managed to get a total of just 70 minutes. This would by no means be sufficient to obtain a good-quality image of the Elephant’s Trunk Nebula. However, I decided to do the data reduction anyway and combine the data into an image. The reasoning was to be able to compare the progress as I gathered more data on the target. With just 70 minutes of data, this is what my astrophoto looks like.

Besides not having enough data to completely see the dust and the nebula in this astrophoto I had to stretch the curves quite a lot to be able to see anything. Hence the astrophoto is a bit overprocessed. If you look closely at the astrophoto you can see some of the dust and the Trunk of the Elephant is starting to emerge from the background.
The factor of 2
When capturing light from space there are some limitations to what we can do. We like to get as many photons as possible in the shortest possible time. To get better images one could use a faster aperture telescope. However, I do not have a telescope that is faster than F/6.3 so I am limited by that – hence to get better astrophotos I will have to double the exposure time to see any significant improvement in the photo.
Hence I went out again and with the same setup and 120-second exposures, I managed to collect 3 hours of data in total including the 70 minutes I already had acquired. Below you can really see the improvement.

Now you see the difference, all the nice dust in the nebula starts to appear from the background. I was able to push the image further this time as well, still a bit overprocessed. And the Elephant’s Truk suddenly starts to emerge from the gas in the nebula. Below is a direct comparison between the two images, unfortunately, the crop is not identical, hence the overlay is not perfect. but that means you can examine the same part of the astrophoto in both images at the same time.


I am done with IC 1396 for now.
The other night I went out again with my camera, remembering that these observations were done without any filters. This time I managed to collect an entire night’s worth of data, which is approximately 4 hours of data. Hence I now have around 7 hours of data on the Elephant’s Trunk Nebula. This has increased the level of detail in the gas of the nebula, again you can argue that I have pushed the processing a bit too far. Especially with the colour noise that has been introduced from the processing.
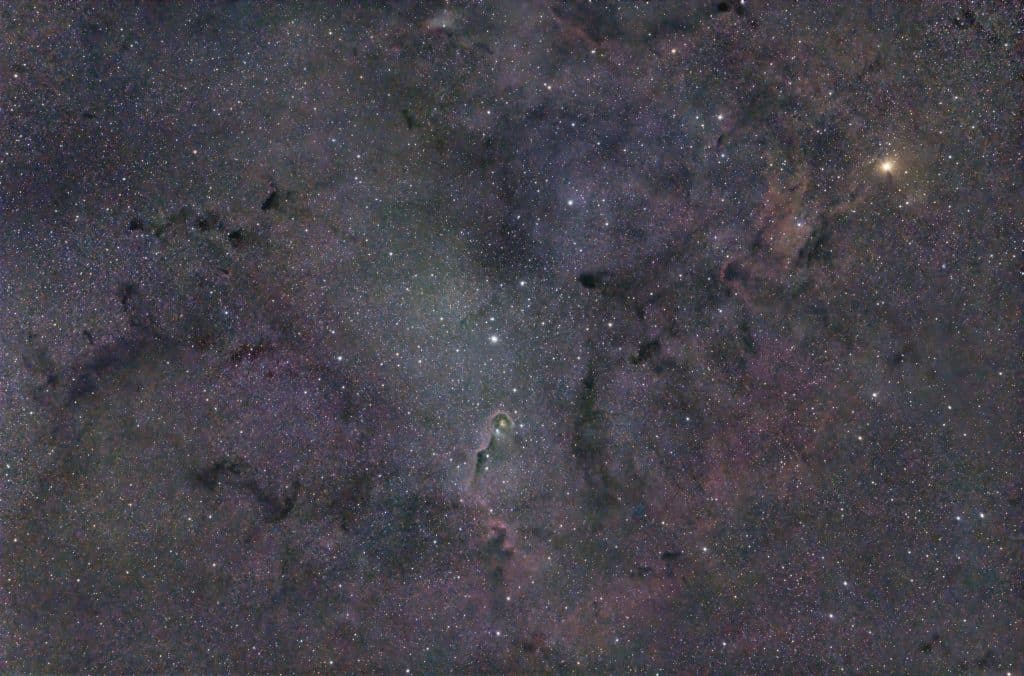
I must say that I am pleased with the result. Having no filter makes my observations vulnerable to light pollution, however, living in a Bortle class 4 area does help. But I think I would need a better telescope and perhaps a better mount to provide at better result.
Below you can find a comparison between the 3-hour image and the 7-hour astrophoto.
