
Table of Contents
Five months ago I started doing astrophotography a bit more seriously – This post is all about what you might achieve with 5 months’ worth of experience. My first dedicated night was January 5th 2024 – I remember that it was a cold night with temperatures around -10^{\circ} C.
I had not received my star tracker at this point, hence I took images at focal lengths of 150 mm with my Nikon Z5 camera. I had no experience working with images to get a good astrophoto afterwards. Holding a master’s degree in astronomy meant that I understood the process of the basic reduction of data – like working with bias, flats and darks from my time in academia. This advantage helped me a long way in my initial part of the journey.
The first real astrophoto
During my first night of astrophoto, I had to choose which target to observe. My obvious choice was based on the fact that M42, M45 and M31 were high in the sky and from my home in a Bortle 4 area they can be seen without aid.

I have never published this image as I am not pleased with the outcome. But looking back this image was taken with a 150 mm lens on a regular tripod, with no tracking and no guiding, only the in-camera intervalometer that is capable of taking 9 images in a streak. However, this image shows M31 quite clearly and we can start to see the faint companion dwarf galaxy M110 below M31. With the experience I had at the time, I was not able to do better than this where the central bulge of M31 is quite visible.
Furthermore, I did not collect all the data that the night would have allowed for which was approximately 8 hours – that would have resulted in a completely different image. Instead, I collected approximately 30 minutes on M31, then 45 minutes on M42 and finally about 1 hour on M45. For this reason, I was not able to pull the dust lanes of the spiral arms out and get more detail from the photo.
Better equipment and more experience
Approximately two months later I updated my astrophoto rig with a star tracker the fantastic Star Adventurer GTi, you can see Trevor Jones’ review of this mount here. I had purchased a guide camera and a guide scope and then in March I was able to get an image of M31 again. This time I was able to take images at a focal length of 600 mm and I had learned to acquire a vast amount of data to stack.
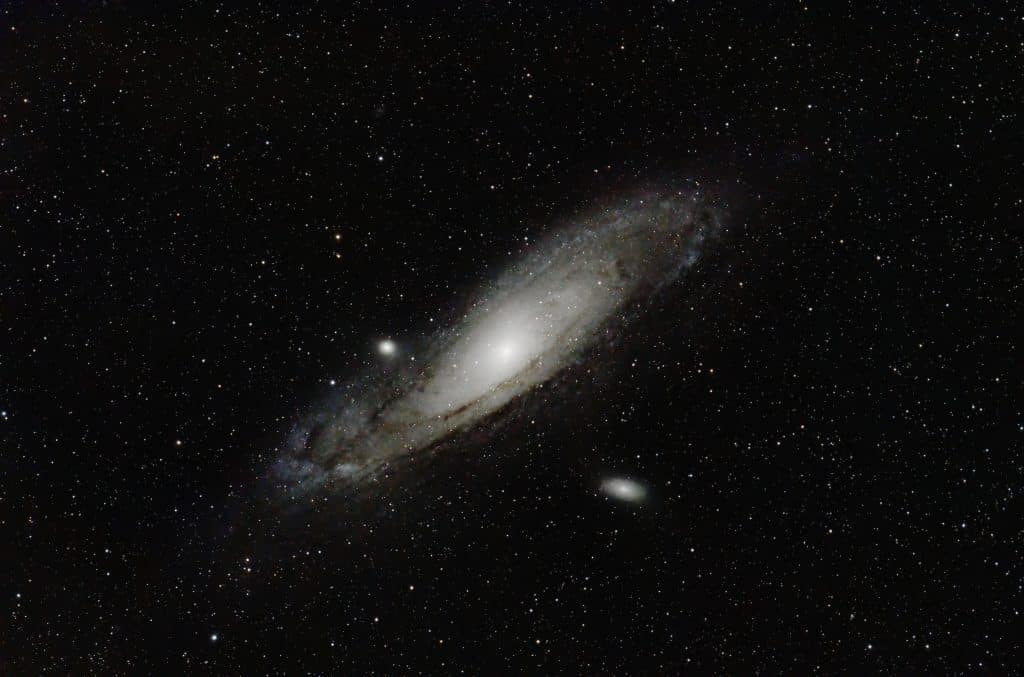
This time around I was able to process the image much better to get all that beautiful dust out. Furthermore, I like the composition much more in this image. Besides the obvious point that the zoom makes a tremendous difference for the composition, also the exposure has been tripled, which results in a way higher dynamic range of the photo. There are definitely some changes in the processing skills, between these two photos, but there are also changes equipment-wise. This raises an important question.
What happens if I process the same data again?
I decided to go back an have a look at one of my absolute favorite objects SH2-275, more commonly known as the Rosette Nebula. The Rosette Nebula is a fantastic and beautiful Hydrogen-rich emission nebula located close to the constellation of Monoceros. The open cluster NGC 2244 is closely associated with the nebulosity, as the stars of the cluster have been formed from the matter of the nebula.
The Rosette nebula is located approximately 5200 light-years from Earth and has an apparent magnitude of 9.0 which makes it invisible to the naked eye. The nebula has an apparent dimension of 1.3^{\circ} which is equivalent to a radius of 65 light-years.
The location of the Rosette Nebula is
Right Ascension (RA): 06^{\mathrm{h}}~33^{\mathrm{m}}~45^{\mathrm{s}}
Declination (\delta): +04^{\circ} ~59' ~54''
The beautiful nebula originates from young hot stars that excite the atoms in the nebula causing the atoms to emit radiation that is visible to us. The mass of this nebula is estimated to be around 10000 times the mass of our Sun.
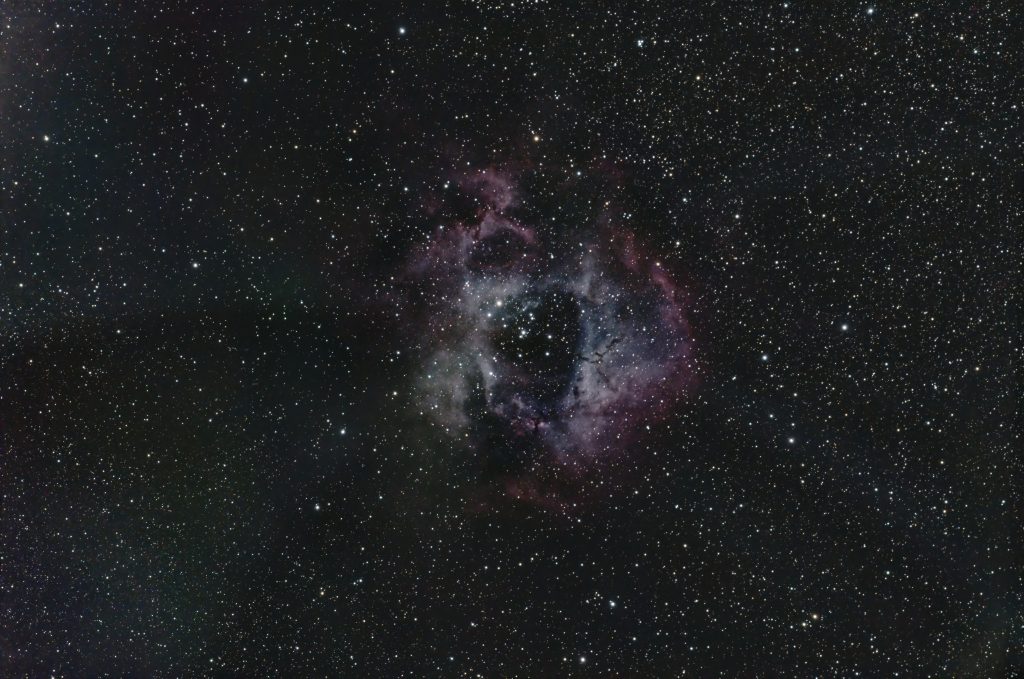
The first attempt
The Rosette Nebula was one of the first Nebula targets that I observed. I managed to collect a total of 1 hour and 27 minutes on the target using an unmodified Nikon Z5 and no filters used. The data was collected on the nights of March 8th and April 7th. The first night I collected 20 light frames 10 frames with exposure times of 30 seconds and 10 frames with exposure times of 60 seconds. Yielding a total of 15 minutes of observations.
on the second night of observations, I collected a total of 38 frames of 120 seconds each yielding a total of 76 minutes worth of observations, unfortunately, I had two frames that were discarded by WBPP – providing me with a total of 1 hour and 27 minutes of observations of the Rosette Nebula.
At the time of writing, I have processed the data three times independently and achieved three very different results. The data has been processed in PixInsight, using the RC-plugins. This is why I conclude that the difference in the final image has to do with my experience with data processing and PixInsight.
Below you can see my first attempt to edit this picture. At the time I was very pleased with the result. As you can see below the Nebula is quite faint in this image but it is clearly visible.
The second attempt
Approximately one month later – the weather in Denmark had been awful so I decided to reprocess the data on the Rosette nebula once more to see what I could get out of the data with the PixInsight skills I had developed using the program for a month. Here the experience is clearly seen. I managed to pull far more of the nebulosity out of the data, making the nebula stand out way better than the original photo.
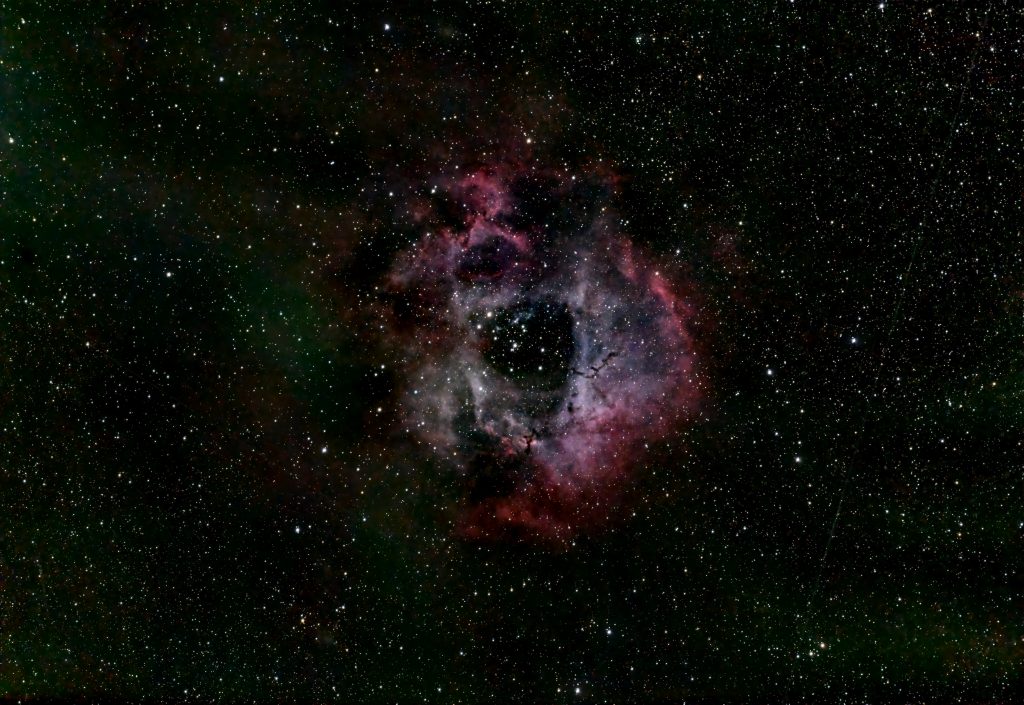
The main difference is experience with the curves tool and the stretching of the photo from the linear state, which has been done with the screen transfer function and the histogram transformation tool. I like this new edit much better than the original image.
The Rosette Nebula is one of the favourite targets of many astrophotographers, which can be seen on astrobin which at the time of writing has around 4000 entries with images of the Rosette Nebula. Most of these entries portray the nebula in different colour schemes than my raw colour images.
The third attempt
Since my last try on the Rosette Nebula data, I have acquired two months of experience. In this time I have learned various ways of stretching the data from the linear state. I have also had experience with narrowband normalization which can change my raw colours to something that portrays either HOO or SHO. For this final image, I have used the Generalized Hyperbolic Strech which I have by no means mastered yet, but I have come a long way.
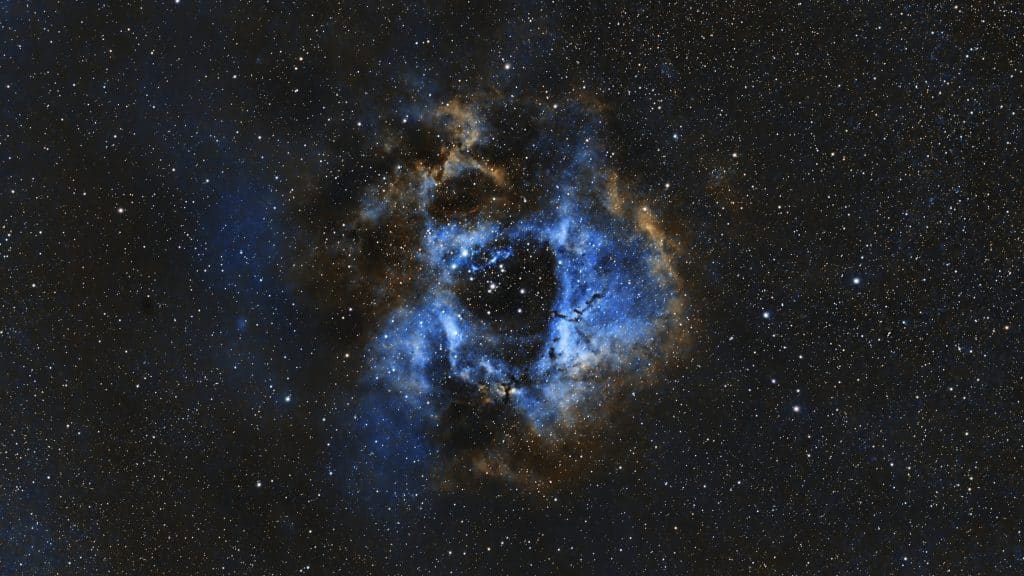
The Image above is the one I am most happy about. I have also applied the Star reduction algorithm to get the nebula to stand out more from the background. In my opinion, this third version is by far the best one despite the Colours are not real. The experience gained from working with the same set of data over and over again has proven to be of great value.
Thank you for reading and Clear skies…